November 29, 2009

Bad Day....Bad Day!!

I will always remember this day...this is the day where my hot shoe spoiled and I cannot trigger my flashgun!!!

Anyway, back to the point. This is my first try on Thematic Portraiture shooting and I'm very honored to be in part of this session.

The theme was "Joker", more to the dark side I perhaps. Before this day I have no idea what I'm going to shoot as I joined last minute. I believe this is resembling the Joker in the Batman Movie - "The Dark Knight".


Special thanks to our Model & Make-up Artists. =)

------------------------

UPDATE: Camera sent for repair on 07/12/09, taken back at 10/12/09, hot shoe replaced. Good service there, Canon.

November 27, 2009

Dragonfly

Getting near to a dragonfly may seem hard because it is quite sensitive to movements around it. However, if you study the pattern of their behaviour, it is actually one of the easiest insect to get 1:1 magnification.

Today is my first try on photographing dragonflies. I have found out some tips:

1) Look for small streams, they like to be there & rest on small branches & leafs that sticks out.

2) Even they fly away, they will still return and land on a few particular spots. Stand near the spot and wait.

3) Exploiting their behaviour in #2, I found that I can actually create movements on purpose (such as swinging my hands in front of them, they will fly away, but eventually return). Do it a few times, they will find no threat from you and will not response much to your movement. This is the time to get close.

But today is not my day, I have forgotten to charge my batteries for my flashgun. After trying a few shots, my batteries are finished when I'm about to get some really close 1:1 shots.

This is the best I can get for today:


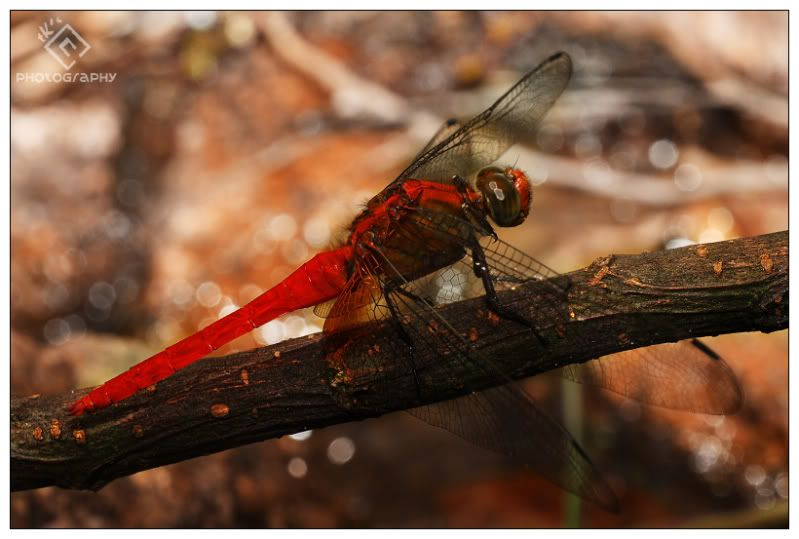
(Not 1:1 yet, I'm still studying and observing their behaviour when I took this pic)


I also found this interesting insect moving on top of the surface of the water:


(I'm not very sure the exact scientific name of this creature, but it is from the Family of Gerridae)


This dude moves extremely fast and its very hard to get a shot of it. The worse part is, it moves constantly. It floats on top of the water using surface tension.

I also found this tiny spider on my car's windscreen when I'm about to return:


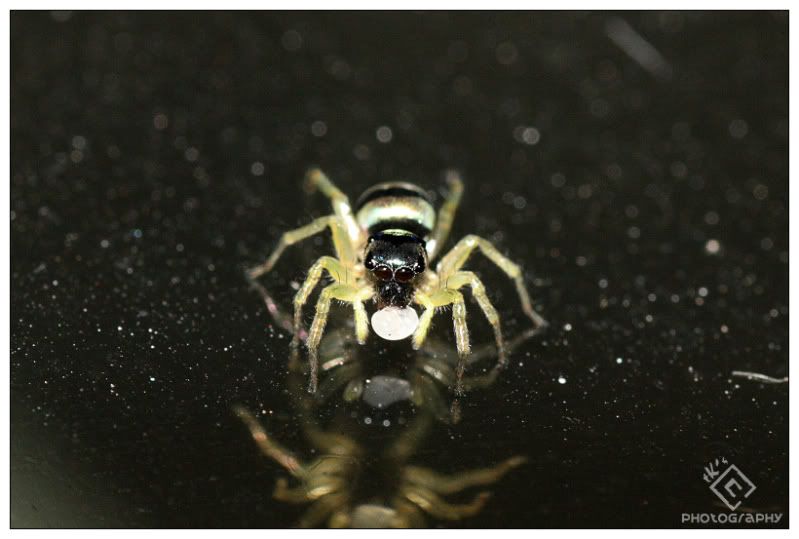
(My batteries fully drained, so I have to rely on ISO1600 + built in flash to get this pic = bad result)

November 26, 2009

New Gears in the House XI

This is my first time dealing with Shashinki. Shashinki is Malaysia's largest (according to them) online photography shop.

Remember the old imitation "Lenspen" I bought few months ago? Well the tip of the brush is spoil. So I am planning to buy an original Lenspen from Shashinki. I also bought an Hot Shoe Spirit Level used for landscape photography. This is useful especially in doing panoramas.


Their service is good. I paid the bill on Tuesday night, & received confirmation on Wednesday morning, receive the goods on Thursday afternoon.


Price: RM 29.80 + 28.00
Discount: RM -
Net: RM 57.80

Total spending to date: RM 5,960.55

November 14, 2009

Smoke Trails Photography IV

Its a rainy day again. As boring as usual, I play on one of my old projects again - Smoke Trails.


Focus Stacking

Focus Stacking is extremely useful in macro works. as I mentioned before, the Depth of Field (DOF) in macro photography is so shallow that even 1mm of movement makes huge difference.

In order to get maximum DOF, theoretically we must use the smallest aperture possible. However problem like diffraction & lack of light (exposure) arises when you use the smallest aperture. You still get maximum DOF in smallest aperture, but you don't get the sharpest picture.

The other solution to this is focus stacking. Take several pictures with different area of focus of a close up object and blend the pictures into a single picture, only keeping the focused area.

Here is an example:


(focus #1, look at the arrow, that area is out of focus)


(focus #2, look at the arrow, that area is out of focus)


After focus stacking:


(look at the 2 area previously pointed by the arrow, they are now sharp & crisp)


Bear in mind that there are still other areas in the picture is out of focus, they can easily fixed by stacking the 3rd and 4th picture and so on...

In this example, only 2 pictures are used.


Tutorial:

1) File > Scrips > Load File into Stack. Choose the source files, tick the "Attempt to Automatically Align Source Images" check-box.

2) Select the most bottom layer, turn off visibility all other layers. Add a layer mask for the bottom layer and use Brush tool (B) to paint out any area that are not sharp.


(The visibility of other layers have been turned off, the visibility is indicated by the eye icon)


3) Repeat step 2 for other layers. Only work on 1 layer at a time and only turn on visibility of 1 layer a time.


(the visibility of first layer is turned off)


4) Reveal all layers, if the picture looks OK, flatten and crop out the edge. Adjust Curve, Saturation and finally Sharpen the picture.

November 07, 2009

Rennie @ Putrajaya

This is the 2nd time I meet Rennie, she is becoming more and more beautiful now. My first try on night portrait.


Lesson learned: use safe shutter speed.
Related Posts with Thumbnails